It's nearly Halloween, and while it's not an Australian custom, it is a bit of fun.
We do a bit of Halloween in our house, love to carve a pumpkin, and have friends and family around. An excuse really!
Here is a LO of my 'black cat' - yes... 'Blackie'! (He's 17!)
He has the most amazing coloured eyes - perfect for the colours of Halloween
Background paper: Carter Bella- Well Travelled‘Excursion red/jet black’
(I liked this as its not a 'black' black - just slightly lighter)
Pattern Papers and some of the element quotes used are from: Authentique Enchanted 12 x12 Collection Kit
These papers are gorgeous and such thick quality. The background paper and a bit of orange cardstock has been added in the photo.
Time to cut, distress the edges with a Tim Holtz Distressor and outline with a black pen
Time to get out that palette knife and
it's a really good idea to use a mixed media non-stick mat
or
And pictured below are the three pots that come in a set Prima's Finnabair Texture Paste
So using this along with this 12x2" Prima Mask (oh my, this mask has been reduced from $13.50 to $2.95!)
Here we go!
This is the first time I've used this paste, so it's all experimental!
I have in my head how it might turn out... lets see what happens!
Swipe the texture paste with the knife over the mask - hold it firmly in place! Trying not to let the texture paste 'bleed' under the mask...
I have in my head how it might turn out... lets see what happens!
Swipe the texture paste with the knife over the mask - hold it firmly in place! Trying not to let the texture paste 'bleed' under the mask...
A close-up....so far so good!
Now to try the next colour.... all good, even blended well!
Oh dear!!! Not good! It 'bled'! The mustard colour is a little more runnier than the other two which would be great to use on other genres...hmmn...or perhaps it needed mixing up more in the pot -
but I love the stuff!!!
SO, yes, it happens! Time to try rectify.. and when I look at it - I think there's too much mustard colour there for my LO...
So after it dried... I stencilled over with the dark texture paste again and the result is great and rather like a touch of mustard colour showing through. Whoohoo...like I said....love this stuff!
Time to set this aside to dry, and ........
Now its time to look at these little bats....
We're going to make up some little embossed bats on black cardstock....
Using 'The Essential Glue Pad' (really need this to keep those bigger enamel flakes to stick)
And this fabulous little bat stamp from Teresa Collins Masquerade Party Stamp Set press onto the a piece of black cardstock scrap.
(Notice I'm using my ruler for my stamp block - ugh...its because I cant find my stamp blocks! We have 'the borrowers' in my house and they live in the 'black hole'... and when I finally replace what I have lost - suddenly - pooooof... it turns up! Halloween and all! But seriously, does anyone else have a black hole in their house? Other notable things that go missing are scissors and sticky tape!!)
Because the stamp is little and the enamel embossing flakes are so big, the word 'Spooky' wont be seen.
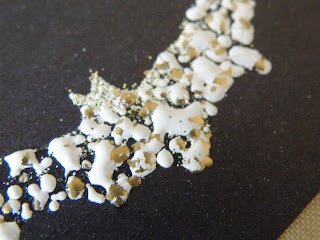
How much do I love Stampendous Fran-tage Embossing Enamels!!!!
This one is Shabby White
Micro shot.....Can you see the gold in it! AWESOME!
I could have press down the flakes more into the glue so they stayed without the gaps when using the heat gun... but I do love this effect!
Here is the Aged Spice Enamel...oooh!
This time, I pressed these flakes into the glue left by the stamp, then used the heat gun.
These Fran-tage Embossing Enamels would be great on chipboard pieces and diecuts!! (Oh MY!)
Now cut out the little bats, scatter onto the LO and glue down :)
Extra embellishments:
Let's get into a little Halloween!
Some fabulous products


No comments:
Post a Comment