 |
| The finished album front |
Lets start with having a look at the scraps, a few cut-outs from dies, some mesh and chipboard base, (the colours do not matter, we are going to cover them up)
Using your Multi Medium (Matte) as a glue, start layering up your scrap, painting under and over the scraps covering it well - use your brayer if you have one to roll over it and push it down flat. Using different thicknesses of paper and textured mesh work well as they then add dimension to the finished product. Set it aside to dry for a while
Now the trick is to trim down the outer edges and continue to layer. Try not to have a preconceived idea about where your project is headed. Set that aside to dry for a while - it won't take too long.
Apply a coat of Gesso. If you don't have Gesso, some watered down white acrylic paint will work, wait a little while for that to dry and apply a second coat - at this stage you want a good cover of white but if a little of the under colour is showing through, that is all good too.
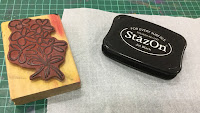
While all this is drying, find your favourite stamp with components you can cut out (on this one it was the flowers) some Staz-On or other alcohol based ink, an old book that you can tear pages from. Also find some thin tissue paper, the backing off a serviette works well too. Apply your stamp to the tissue paper and the same image to a page from the book (a few times, that way you have extras to play with).
Using a few different colours of Gelatos (the Tim Holtz distress crayons can also be used) Start colouring in the flowers on the book pages. Just draw roughly around the edges with your crayon, take your water brush and shade it into the middle. Don't worry about keep the outside neat, we are going to cut these out
Next step is easy, cut out the flowers or your chosen stamp - just inside the black line works well - just the individual flowers, not the stems or anything. Set those aside
Take either a water pen or a paintbrush with a little water on it, run a ring around of water around your image (not to close) and gently tear the excess tissue paper away. Cutting out the tissue paper will create a string line, while tearing it gently will give it a soft finish and it will bend in a little better. Pop all of the flowers aside for now - we will be using them later.
Now your base is dry, we can start colouring. Again just apply a rough line of colour around your different areas and using something damp to blend with give it a gentle rub around, if it is not dark enough add more but start with a light coat, it is easier to go darker than it is to go lighter
Using the Multi Medium, brush a layer over the top of the cover you have been working on. Place the tissue paper down and brush another coat over the top while the bottom is still wet. The reason we do it on the tissue paper is it is almost impossible to stamp a good image over a rough surface - by doing this we can get a good quality stamped image down on our project
Take the cut-out flowers from earlier and apply them to the matching stamped image on the cover, again using the multi medium to glue them down.
At this stage I decided I wanted some more dimension, so I grabbed a stencil and some Modeling Paste and popped a little extra on the cover.
Final step, again with the Multi Medium, I applied some 1/4
doilies to the corners, a little more colour with the Gelatos - remember it is easier to go darker than lighter. I will add a coat of Mod Podge to finish it
off after I have looked at it for a little while and decided I am happy
with it.
You can use these techniques on all sorts of projects. Let your imagination run wild!
You can use these techniques on all sorts of projects. Let your imagination run wild!


No comments:
Post a Comment